Setting up a robust and reliable hosting and deployment pipeline for your WordPress site can seem like a daunting task, but with the right tools and a clear process, it can be done smoothly and efficiently. This article walks you through a proven process that combines the capabilities of Digital Ocean, GridPane, Snapshooter, AWS, Git, and Buddy Works to create a secure, performant, and easily manageable WordPress hosting environment.
Disclaimer: article has affiliate links. I use all of those recommended providers on daily basis.
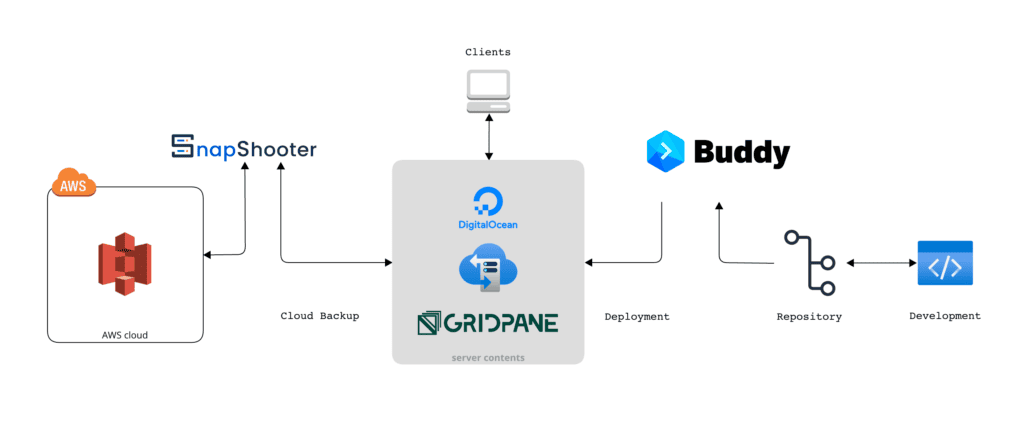
The journey begins with setting up accounts on Digital Ocean and GridPane, where you will provision your server and create your first WordPress site. Snapshooter steps in to handle automatic backups, while AWS S3 provides a reliable storage solution.
Next, we venture into version control with Git, creating a project for your site's theme or plugin. LocalWP is introduced here to enhance your local development experience and seamless connection with GitHub right in your VS Code editor.
Finally, Buddy Works sets the stage for a Continuous Integration and Deployment (CI/CD) process, complete with SSH keys for secure connections and deployment pipelines for automatic code deployment.
Throughout the article, each step is broken down in detail, providing a comprehensive guide that helps you understand not only the 'how,' but also the 'why' behind each decision.
Whether you're a seasoned WordPress developer or a newbie eager to learn, this article demystifies the process of setting up a WordPress hosting and deployment pipeline, helping you create efficient workflows that save time and reduce the chances of error. Follow along, and you'll be on your way to mastering WordPress hosting and deployment.
Set up an account on Digital Ocean for cloud server management
Digital Ocean is a cloud infrastructure provider that offers various services like virtual servers (called cloud compute), object storage, and managed databases. To get started, visit Digital Ocean and sign up - use the link to get 200$ credit valid for 60 days. You'll need to provide an email address and a password, and then verify your email.
Once you're logged in, you may need to add a payment method and complete a brief security check. After successfully setting up your account, you'll be able to create and manage droplets, which will be used for hosting your WordPress site.
Create an account on GridPane for server management
GridPane is a server management platform specifically designed for managing WordPress sites on cloud servers like those provided by Digital Ocean. GridPane offers features such as server provisioning, security, performance optimization, and more. To create an account, visit GridPane and click on "Free sign up".
I am using a Panel plan, but for a few servers (a with limited options) the free Core plan should do just fine. We will cover the backup process later with Snapshooter, that’s not covered with the Core plan.
You'll need to enter your name, email address, and create a password. After verifying your email address, you'll be able to log in to your GridPane account and begin setting up your server for your WordPress site.
Connect Digital Ocean with GridPane
In order to manage your Digital Ocean droplets through GridPane, you'll need to connect your Digital Ocean account to GridPane using an API token. To do this, first, log in to your Digital Ocean account and navigate to the API section (https://cloud.digitalocean.com/settings/api/tokens). Click "Generate New Token," provide a name for the token, and ensure both read and write permissions are selected. Copy the generated token.
Next, log in to your GridPane account, and go to the "Integrations" section. Click on the "Digital Ocean" card, and paste the API token you generated earlier into the "API Key" field. Click "Connect" to link your Digital Ocean account with GridPane. For more detailed instructions, you can refer to GridPane's knowledge base article: https://gridpane.com/kb/provision-a-digital-ocean-droplet-using-the-digital-ocean-api/
Provision a server in Digital Ocean through GridPane
With your Digital Ocean account connected to GridPane, you can now provision a server (droplet) for your WordPress site. In your GridPane dashboard, click on the "Servers" tab, and then click the "Provision New Server" button. Select "Digital Ocean" as the provider, and choose the server size, datacenter location, and server operating system (GridPane recommends Ubuntu 20.04 LTS) based on your needs and preferences. Provide a name for your server and click "Provision Server."
GridPane will automatically set up the server, install necessary software, and optimise it for WordPress. Once the server provisioning process is complete, you'll see your new server listed in the "Servers" tab of your GridPane dashboard.
Create your first site from the GridPane panel
After provisioning your server, you can create your first WordPress site using the GridPane panel. Click on the "Sites" tab in your GridPane dashboard, and then click the "Create New Site" button. You'll be prompted to select the server you provisioned earlier.
Enter the domain you want to use for your production site or a staging domain if you want to test the flow. For example, use "yourdomain.com" for the production site or "staging.yourdomain.com" for a staging site. You'll also have the option to select the PHP version (GridPane supports various PHP versions, but it's recommended to choose the latest stable version for the best performance and security).
GridPane also allows you to enable server caching, such as Redis or FastCGI, to improve the performance of your WordPress site. Additionally, you can choose to enable a Web Application Firewall (WAF) for enhanced security. After configuring these settings, click "Create Site" to proceed. GridPane will automatically set up the site, install WordPress, and configure the domain and SSL certificate.
If you want to automate deployments of your custom theme - install it and activate on the site.
Recommended: Add an AWS S3 bucket for backups storage (12 months free)
Amazon Web Services (AWS) offers a service called S3 (Simple Storage Service) that can be used for scalable storage of data, files, and backups. When you sign up for AWS, you get 12 months of free tier access, which includes limited usage of various AWS services, including S3.
To set up an S3 bucket for your WordPress site, first sign up for an AWS account by visiting this URL: AWS - free tier. You'll need to provide an email address, a password, and some basic contact information.
Once you've signed up and logged in, navigate to the S3 service. Click on "Create bucket", give your bucket a unique name, and select a region that's geographically close to where your website's primary audience is located for best performance. You can leave the other options at their default settings for now. Click "Create" to create your bucket.
AWS S3 can be a good place to store your Snapshooter backups, static files, or other data associated with your WordPress site.
If you prefer you can also use Microsoft Azure, Dropbox or Google Drive to store the external backups.
Set up a Snapshooter account for backups
Snapshooter is a backup service that integrates with GridPane and Digital Ocean to help you create and manage automatic backups of your WordPress site. To set up an account, visit Snapshooter and click on "Get Started". You'll need to provide an email address and create a password. After verifying your email, log in to your Snapshooter account.
Connect the server with Snapshooter
To connect your GridPane server with Snapshooter, visit the app panel and follow the instructions to connect your GridPane account. You'll need to connect as root to a server run by GridPane and paste the commands from Snapshooter. After establishing server Snapshooter connection you can fine tune the backup settings like exlucuding some media folders.
Once connected, you can set up a daily backup schedule for your WordPress site, configure retention policies, and exclude specific folders from backups to save them in your storage zone . Snapshooter will automatically create backups according to your preferences, and you can easily restore your site in case of any issues or data loss.
Set up a Git project for the WordPress site theme or plugin and create appropriate branches
Git is a version control system that allows you to track changes to your code over time and collaborate with other developers. If you're developing a custom theme or plugin for your WordPress site, it's a good idea to create a Git project (also known as a repository or repo) to manage your code.
Init repository in your custom theme or plugin folder. From VS Code you can easily publish the repository to Github, a web-based hosting service for Git repositories, so that you can easily collaborate with others, keep a remote copy of your code, and integrate with tools like Buddy Works for easier deployment.
You'll likely want to create at least two branches in your repository: one for staging (for testing and development) and one for production (for the live version of your site). You can create a new branch with the git branch [branch-name] command and switch to it with the git checkout [branch-name] command. In the VS code you can also use the graphic interface to create and publish the appropriate branch.
You can make changes, commit them to your Git repo, and push them to GitHub without leaving your code editor. We will use Buddy works for that.
Sign up for Buddy Works and connect it with Git:
Buddy Works is a Continuous Integration and Deployment (CI/CD) platform that enables automated testing and deployment of code. To sign up, visit https://buddy.works/ and click on the "Sign Up" button. You can sign up using your email or directly with your GitHub, GitLab, or Bitbucket account.
Once signed up and logged in, you'll need to connect Buddy Works to your Git repository. To do this, click on "New Project" on your Buddy Works dashboard and select GitHub as the Git provider. If you're not already logged in to GitHub, Buddy Works will prompt you to do so. Once logged in, select your Git repository for your WordPress site.
Important: to save GB Hours before creating a project, change the default machine setting to the: Nano machine.
Create SSH keys in Buddy Works and add them to the GridPane server:
To establish a secure connection between Buddy Works and your GridPane server, you'll need to create an SSH key pair. In Buddy Works, navigate to "Settings" > "SSH Keys" and click on "Generate new key". Give your key a name and click "Add this key".
Once the key is generated, you'll need to add the public part of the SSH key pair to your GridPane server. In your GridPane dashboard, navigate to your account settings and add the new key. Use the name that will help you later quickly identify the key like: BuddyProjectKey. Then go to the server tab and click the key icon. Add the Buddy key.
* Buddy will get the root access to you server - keep in mind that's a potential risk
** Soon GridPane will introduce SSH keys for specific users, so we will be able to set more specific access
Create a deployment pipeline in Buddy Works for the appropriate branch (staging or production):
In Buddy Works, a pipeline is a set of steps that are executed in order to deploy your code. To create a pipeline, navigate to your project in Buddy Works and click on "Add a new pipeline".
Provide a name for your pipeline and select either your staging or production branch as the trigger branch.
Set the trigger mode to "On every push", so that the pipeline runs automatically whenever you push changes to the selected branch on GitHub.
Then, you'll need to add actions to your pipeline to perform the deployment, an example flow might consist of following steps:
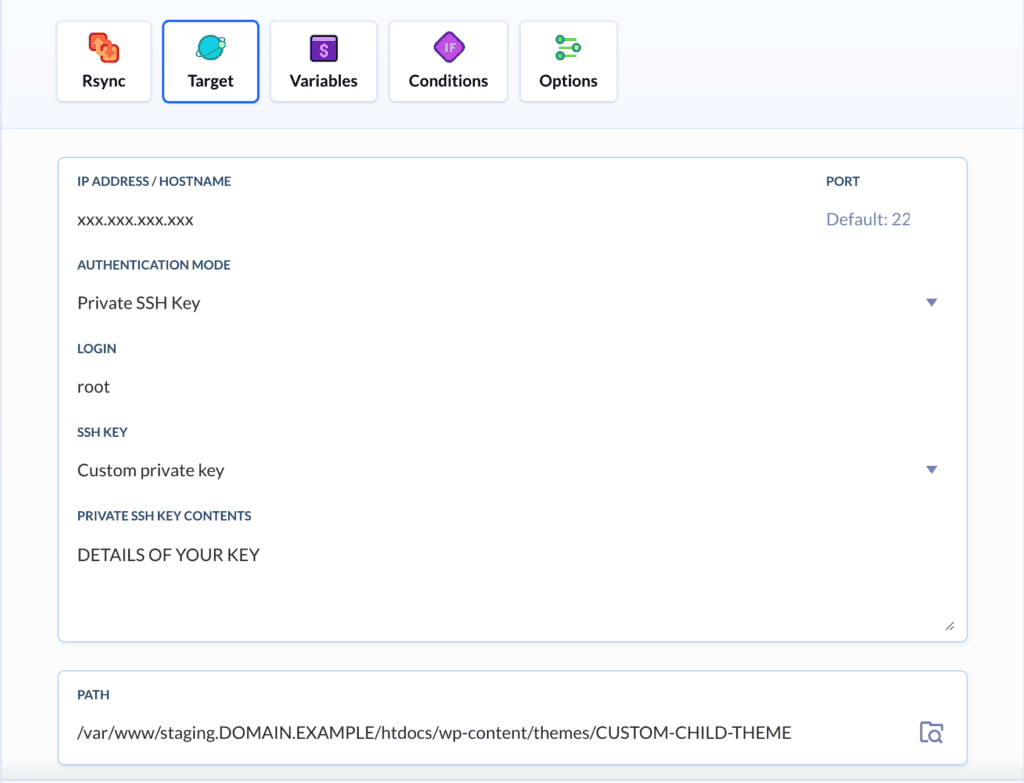
- Rsync the folder: Add an "Rsync" action to copy your code from Buddy Works to your GridPane server. You'll need to specify your server's SSH key, hostname, and the directories to copy. At target tab you will have to specify the folder you will upload the repo files. For GridPane managed site the path will be: /var/www/SITEURL/htdocs/wp-content/themes/THEME-NAME
- SSH to server and clear cache (if used): If you're using any caching mechanisms on your server, add an "SSH Commands" action to clear the cache. The exact command will depend on your server setup.
- Visually compare changes: Again, this step is optional and may not be necessary for every deployment.
- Send email or Slack notification: Finally, add an "Email" or "Slack" action to send a notification when the deployment is completed. You can configure the action to send a notification only on failure, only on success, or on every execution.
- Approve deployment: Add an "Await Approval" action to pause the pipeline until you manually approve the deployment. This step is not necessary, but you may create an additional pipeline that will create a pull request production branch if the staging deployment was approved.
Remember to save your pipeline when you're done setting it up. With default settings your code will now be automatically deployed whenever you push changes to your selected branch on GitHub.
Be sure to test if the deployment runs without any errors.